モバイルアプリの継続利用率を高めるうえで、プッシュ通知は欠かせない機能です。React Nativeでは実装手段が複数あり、プロジェクトの規模や要件によって最適な選択肢が異なります。
ここでは Expo(expo-notifications)、React Native CLI + Firebase Cloud Messaging(FCM)、OneSignal の3つのアプローチを軸に、iOS(APNs)とAndroid(FCM)の仕組みから具体的なコード例、トラブルシューティングまでを体系的に整理します。
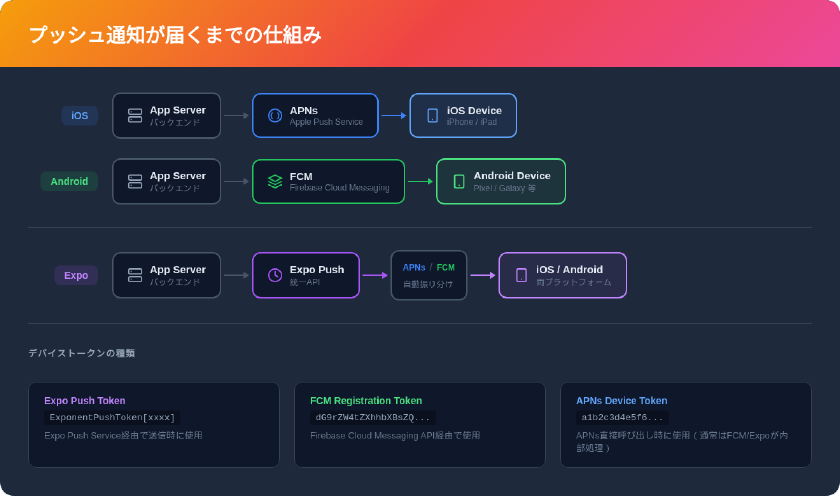
プッシュ通知が届くまでの仕組み
React Nativeアプリへプッシュ通知が届くまでの流れは、iOSとAndroidで経路が異なります。
iOS の場合: アプリサーバー → APNs(Apple Push Notification service) → iOSデバイス
Android の場合: アプリサーバー → FCM(Firebase Cloud Messaging) → Androidデバイス
Expoを使用する場合: アプリサーバー → Expo Push Service → APNs / FCM → デバイス
Expo Push Serviceは、APNsとFCMへの通知送信を統一的なAPIでラップしています。開発者はプラットフォームごとの差異を意識せず、Expo Push Tokenを指定するだけで両OSへ通知を送信できます。
デバイストークンの役割
プッシュ通知の配信先を特定するために、各デバイスは固有のトークンを発行します。このトークンをサーバー側で保存しておくことで、任意のタイミングで特定のデバイスへ通知を送信できます。
- Expo Push Token:
ExponentPushToken[xxxx]の形式。Expo Push Service経由で通知を送る際に使用 - FCM Registration Token: Firebaseが発行するトークン。FCM API経由で通知を送る際に使用
- APNs Device Token: Appleが発行するトークン。APNs直接呼び出し時に使用(通常はFCMまたはExpoが内部で処理)
3つの実装アプローチ比較
| 項目 | Expo(expo-notifications) | RN CLI + Firebase | OneSignal |
|---|---|---|---|
| 初期セットアップの手間 | 少ない | 多い(ネイティブ設定が必要) | 中程度 |
| Expo Goでの動作確認 | SDK 53以降Androidは不可(開発ビルド必須) | 不可 | 不可 |
| ネイティブコードのカスタマイズ | Config Pluginで対応可 | 自由度が高い | SDKの範囲内 |
| サーバーサイド実装 | Expo Push API(無料) | FCM HTTP v1 API | REST API / ダッシュボード |
| 通知の送信コスト | 無料 | 無料 | 無料プランあり(Growthプランは月額$19〜) |
| iOS リッチ通知(画像添付) | 対応(SDK 53以降で強化) | 対応 | 対応 |
| Android通知チャネル | 対応 | 対応 | 対応 |
| セグメント配信 | 自前で実装 | Firebase Analyticsと連携 | ダッシュボードで設定可 |
| 適するプロジェクト規模 | 小〜中規模 | 中〜大規模 | 全規模(マーケ機能重視) |
どのアプローチを選ぶべきか
- Expoプロジェクトで手軽に始めたい場合 → expo-notifications + Expo Push Service
- ネイティブコードを細かく制御したい場合 → @react-native-firebase/messaging
- 非エンジニアもダッシュボードから通知を送りたい場合 → OneSignal

Expo(expo-notifications)を使った実装
Expo SDK 54時点での実装手順です。Managed WorkflowとDevelopment Buildの両方で利用できます。
パッケージのインストール
npx expo install expo-notifications expo-device expo-constants
app.json の通知設定
{
  "expo": {
    "plugins": [
      [
        "expo-notifications",
        {
          "icon": "./assets/notification-icon.png",
          "color": "#ffffff",
          "sounds": ["./assets/notification-sound.wav"]
        }
      ]
    ],
    "android": {
      "googleServicesFile": "./google-services.json"
    },
    "ios": {
      "bundleIdentifier": "com.example.myapp"
    }
  }
}
SDK 54以降、app.json の notification フィールドは非推奨となり、expo-notifications Config Pluginでの設定が推奨されています。
通知権限の取得とトークン登録
import * as Notifications from 'expo-notifications';
import * as Device from 'expo-device';
import Constants from 'expo-constants';
import { Platform } from 'react-native';

// フォアグラウンド時の通知表示設定
Notifications.setNotificationHandler({
  handleNotification: async () => ({
    shouldShowAlert: true,
    shouldPlaySound: true,
    shouldSetBadge: true,
  }),
});

async function registerForPushNotifications(): Promise<string | null> {
  // 実機チェック(シミュレータでは動作しない)
  if (!Device.isDevice) {
    console.warn('プッシュ通知は実機でのみ動作します');
    return null;
  }

  // Android通知チャネルの設定(Android 8.0以上で必須)
  if (Platform.OS === 'android') {
    await Notifications.setNotificationChannelAsync('default', {
      name: 'デフォルト通知',
      importance: Notifications.AndroidImportance.MAX,
      vibrationPattern: [0, 250, 250, 250],
      lightColor: '#FF231F7C',
    });
  }

  // 権限の確認と取得
  const { status: existingStatus } = await Notifications.getPermissionsAsync();
  let finalStatus = existingStatus;

  if (existingStatus !== 'granted') {
    const { status } = await Notifications.requestPermissionsAsync();
    finalStatus = status;
  }

  if (finalStatus !== 'granted') {
    console.warn('通知権限が許可されませんでした');
    return null;
  }

  // Expo Push Tokenの取得
  const projectId = Constants.expoConfig?.extra?.eas?.projectId
    ?? Constants.easConfig?.projectId;

  const tokenData = await Notifications.getExpoPushTokenAsync({ projectId });
  return tokenData.data; // "ExponentPushToken[xxxx]"
}
通知の受信処理
import { useEffect, useRef } from 'react';
import * as Notifications from 'expo-notifications';

function useNotificationListeners() {
  const notificationListener = useRef<Notifications.EventSubscription>();
  const responseListener = useRef<Notifications.EventSubscription>();

  useEffect(() => {
    // フォアグラウンドで通知を受信した場合
    notificationListener.current =
      Notifications.addNotificationReceivedListener((notification) => {
        const { title, body } = notification.request.content;
        console.log('通知受信:', title, body);
      });

    // ユーザーが通知をタップした場合
    responseListener.current =
      Notifications.addNotificationResponseReceivedListener((response) => {
        const data = response.notification.request.content.data;
        // data に基づいて画面遷移などの処理を実行
        console.log('通知タップ:', data);
      });

    return () => {
      notificationListener.current?.remove();
      responseListener.current?.remove();
    };
  }, []);
}
サーバーサイドからの送信(Node.js)
import { Expo, ExpoPushMessage } from 'expo-server-sdk';

const expo = new Expo();

async function sendPushNotification(
  pushTokens: string[],
  title: string,
  body: string,
  data?: Record<string, unknown>
) {
  const messages: ExpoPushMessage[] = pushTokens
    .filter((token) => Expo.isExpoPushToken(token))
    .map((token) => ({
      to: token,
      sound: 'default',
      title,
      body,
      data,
    }));

  // チャンク単位で送信(Expo推奨)
  const chunks = expo.chunkPushNotifications(messages);

  for (const chunk of chunks) {
    try {
      const ticketChunk = await expo.sendPushNotificationsAsync(chunk);
      console.log('送信結果:', ticketChunk);
    } catch (error) {
      console.error('送信エラー:', error);
    }
  }
}
Expo Push APIは無料で利用でき、送信数に上限はありません(出典: Expo Pricing)。
ローカル通知のスケジューリング
サーバーを介さずにデバイス単体で通知をスケジュールすることも可能です。リマインダー機能やタイマー通知に適しています。
import * as Notifications from 'expo-notifications';

// 5秒後にローカル通知を送信
async function scheduleLocalNotification() {
  await Notifications.scheduleNotificationAsync({
    content: {
      title: 'リマインダー',
      body: '予定の時間になりました',
      sound: 'default',
    },
    trigger: {
      type: Notifications.SchedulableTriggerInputTypes.TIME_INTERVAL,
      seconds: 5,
    },
  });
}

// 特定の通知をキャンセル
async function cancelNotification(identifier: string) {
  await Notifications.cancelScheduledNotificationAsync(identifier);
}

// すべてのスケジュール済み通知をキャンセル
async function cancelAllNotifications() {
  await Notifications.cancelAllScheduledNotificationsAsync();
}
React Native CLI + Firebase(@react-native-firebase/messaging)を使った実装
Expoを使わないベアワークフローや、Firebaseの他のサービス(Analytics、Remote Configなど)と密に連携したい場合に適した方法です。
前提条件
- Firebaseプロジェクトが作成済みであること
- iOS: APNs認証キー(.p8ファイル)をFirebaseコンソールに登録済み
- Android:
google-services.jsonをプロジェクトに配置済み
パッケージのインストール
# React Native Firebase のコアモジュール
npm install @react-native-firebase/app

# Cloud Messagingモジュール
npm install @react-native-firebase/messaging

# iOSの依存関係をインストール
cd ios && pod install
iOS側の追加設定
Xcode上で以下の Capabilities を有効にします。
- Push Notifications を有効化
- Background Modes → Remote notifications にチェック
AppDelegate.mm(またはAppDelegate.swift)でリモート通知の登録処理が自動的に行われます。React Native Firebase v6以降はSwift/Objective-Cの手動設定が大幅に簡略化されています。
Android側の追加設定
android/app/build.gradle に Firebase プラグインを追加します。
apply plugin: 'com.google.gms.google-services'
Android 13(API 33)以降では、POST_NOTIFICATIONS 権限の追加が必要です。
<!-- android/app/src/main/AndroidManifest.xml -->
<uses-permission android:name="android.permission.POST_NOTIFICATIONS" />
トークン取得と通知受信
import messaging from '@react-native-firebase/messaging';
import { Platform, PermissionsAndroid } from 'react-native';

// Android 13以上で通知権限を要求
async function requestAndroidPermission() {
  if (Platform.OS === 'android' && Platform.Version >= 33) {
    const granted = await PermissionsAndroid.request(
      PermissionsAndroid.PERMISSIONS.POST_NOTIFICATIONS
    );
    return granted === PermissionsAndroid.RESULTS.GRANTED;
  }
  return true;
}

// iOS権限要求 + FCMトークン取得
async function initializeFirebaseMessaging() {
  // iOS: 通知権限を要求
  if (Platform.OS === 'ios') {
    const authStatus = await messaging().requestPermission();
    const enabled =
      authStatus === messaging.AuthorizationStatus.AUTHORIZED ||
      authStatus === messaging.AuthorizationStatus.PROVISIONAL;

    if (!enabled) {
      console.warn('iOS通知権限が拒否されました');
      return null;
    }
  }

  // Android: 権限を要求
  if (Platform.OS === 'android') {
    await requestAndroidPermission();
  }

  // FCM Registration Tokenを取得
  const token = await messaging().getToken();
  console.log('FCM Token:', token);

  // トークン更新の監視
  messaging().onTokenRefresh((newToken) => {
    console.log('新しいFCMトークン:', newToken);
    // サーバーにトークンを再登録
  });

  return token;
}

// フォアグラウンドで通知を受信
messaging().onMessage(async (remoteMessage) => {
  console.log('フォアグラウンド通知:', remoteMessage);
  // 独自のUIで通知を表示する処理を実装
});

// バックグラウンドで通知を受信
messaging().setBackgroundMessageHandler(async (remoteMessage) => {
  console.log('バックグラウンド通知:', remoteMessage);
});
FCM HTTP v1 APIでの送信(サーバーサイド)
2024年6月にレガシーFCM APIは非推奨となり、同年7月にシャットダウンが開始されました。現在はHTTP v1 APIへの移行が必須です(出典: Firebase公式ドキュメント)。
import { GoogleAuth } from 'google-auth-library';

const PROJECT_ID = 'your-firebase-project-id';
const FCM_ENDPOINT = `https://fcm.googleapis.com/v1/projects/${PROJECT_ID}/messages:send`;

async function sendFcmNotification(
  token: string,
  title: string,
  body: string
) {
  const auth = new GoogleAuth({
    scopes: ['https://www.googleapis.com/auth/firebase.messaging'],
  });
  const client = await auth.getClient();
  const accessToken = await client.getAccessToken();

  const message = {
    message: {
      token,
      notification: { title, body },
      android: {
        priority: 'high',
        notification: {
          channelId: 'default',
          sound: 'default',
        },
      },
      apns: {
        payload: {
          aps: {
            sound: 'default',
            badge: 1,
          },
        },
      },
    },
  };

  const response = await fetch(FCM_ENDPOINT, {
    method: 'POST',
    headers: {
      Authorization: `Bearer ${accessToken.token}`,
      'Content-Type': 'application/json',
    },
    body: JSON.stringify(message),
  });

  return response.json();
}
HTTP v1 APIでは、サービスアカウントのOAuth2トークンによる認証が必要です。従来のサーバーキー方式と比較して、セキュリティが大幅に強化されています。
OneSignalによる実装
OneSignalは、ダッシュボードから通知の作成・セグメント配信・A/Bテストが可能なサードパーティサービスです。マーケティングチームとの連携が求められるプロジェクトに適しています。
セットアップ手順
npm install react-native-onesignal
import { OneSignal } from 'react-native-onesignal';

// 初期化(App起動時に1度だけ呼ぶ)
OneSignal.initialize('YOUR_ONESIGNAL_APP_ID');

// 通知権限の要求(iOS)
OneSignal.Notifications.requestPermission(true);

// 通知クリック時のハンドラ
OneSignal.Notifications.addEventListener('click', (event) => {
  console.log('通知がクリックされました:', event);
});
OneSignalの無料プランでは、モバイルプッシュ通知の送信数・購読者数に制限がありません。Growthプランは月額$19〜で、高度なセグメント配信やA/Bテスト機能が利用できます(出典: OneSignal Pricing)。
iOS・Androidプラットフォーム固有の注意点
iOS固有の設定
APNs認証キー(.p8ファイル)の取得手順:
- Apple Developer Console → Certificates, Identifiers & Profiles → Keys
- 「+」をクリックして新しいキーを作成
- 「Apple Push Notifications service (APNs)」にチェック
- キーをダウンロード(.p8ファイル、再ダウンロード不可)
- Key ID・Team IDとあわせてFirebaseコンソールまたはExpoの認証情報に登録
Provisional Authorization(仮許可):
iOS 12以降では provisional オプションを指定することで、ユーザーにダイアログを表示せず通知を仮許可状態で配信できます。仮許可の通知は通知センターに静かに配信され、ユーザーが明示的に「目立つ形で配信」を選択するまでバナー表示されません。
Android固有の設定
通知チャネル(Android 8.0以上): Android 8.0(API 26)以降では、すべての通知を通知チャネルに割り当てる必要があります。チャネルごとに音・バイブレーション・重要度を設定でき、ユーザーがチャネル単位で通知のON/OFFを切り替えられます。
// Expoの場合
await Notifications.setNotificationChannelAsync('marketing', {
  name: 'マーケティング通知',
  importance: Notifications.AndroidImportance.DEFAULT,
  sound: 'default',
});

await Notifications.setNotificationChannelAsync('urgent', {
  name: '緊急通知',
  importance: Notifications.AndroidImportance.MAX,
  sound: 'alarm.wav',
  vibrationPattern: [0, 500, 250, 500],
});
POST_NOTIFICATIONS権限(Android 13以上):
Android 13(API 33)からは、通知の表示にランタイム権限が必要です。アプリ側で PermissionsAndroid.request() を使って明示的に権限を要求する処理が必要です。
プッシュ通知が届かないときのトラブルシューティング
通知が届かない原因は多岐にわたります。以下にOS別・サービス別のチェックポイントを整理します。
共通のチェックポイント
| チェック項目 | 確認方法 |
|---|---|
| 通知権限が許可されているか | 端末の設定アプリ → アプリ → 通知 |
| デバイストークンが正しく取得できているか | コンソールログで確認 |
| サーバーにトークンが正しく保存されているか | DBまたはAPIログを確認 |
| 通知ペイロードの形式が正しいか | FCMやExpoのバリデーションエラーを確認 |
| ネットワーク接続が正常か | Wi-Fi / モバイルデータの状態を確認 |
iOS固有のトラブル
- シミュレータではプッシュ通知を受信できません。 実機での検証が必要です
- APNs証明書の期限切れ: .p8キーには有効期限がないため、.p8方式への移行が推奨されます
- Background Modes未設定: Xcodeで Remote notifications が無効だとバックグラウンド通知が届きません
- Provisioning Profileの不一致: Push Notifications Capability が有効なプロファイルを使用しているか確認
Android固有のトラブル
- google-services.jsonの配置ミス:
android/app/ディレクトリ直下に配置されているか確認 - バッテリー最適化: 一部のメーカー(Xiaomi、Huawei、OPPOなど)は独自のバッテリー最適化がプッシュ通知をブロックします。ユーザーに自動起動設定の許可を案内する必要があります
- 通知チャネル未設定: Android 8.0以上でチャネルが未設定の場合、通知が表示されません
- Expo Goの制限: SDK 53以降、Android版Expo Goではプッシュ通知が動作しません。開発ビルド(
npx expo run:android)を使用する必要があります
Expo Push Service固有のトラブル
- Expo Push Tokenの取得に
projectIdが必要です。 EASプロジェクトに紐づいたIDが未設定だと取得に失敗します - チケットとレシートの確認: Expo Push APIは非同期で処理されます。送信直後の
ticketでokが返っても、最終的な配信状態はreceiptで確認する必要があります
通知のテストとデバッグ手法
Expo Push Notification Tool
Expoが提供する Push Notification Tool を使うと、Expo Push Tokenを入力するだけでテスト通知を送信できます。サーバーサイドの実装なしに動作確認が可能です。
Firebaseコンソールからのテスト送信
Firebaseコンソール → Cloud Messaging → 「新しい通知」から、FCMトークンを指定してテスト通知を送信できます。
cURLでの送信テスト
# Expo Push APIへの送信
curl -X POST https://exp.host/--/api/v2/push/send \
  -H "Content-Type: application/json" \
  -d '{
    "to": "ExponentPushToken[xxxx]",
    "title": "テスト通知",
    "body": "動作確認用のテスト通知です"
  }'
バッジ管理の実装
iOSのアプリアイコンに表示されるバッジ数を制御する方法です。
import * as Notifications from 'expo-notifications';

// バッジ数を設定
await Notifications.setBadgeCountAsync(5);

// 現在のバッジ数を取得
const count = await Notifications.getBadgeCountAsync();

// バッジをクリア
await Notifications.setBadgeCountAsync(0);
通知ペイロードの badge フィールドで送信時に指定することも可能です。未読通知の数をサーバー側で管理し、送信時に指定するパターンが一般的です。
EAS Buildとの連携
Expo Application Services(EAS)を使ってビルドする場合、プッシュ通知の動作には 開発ビルド(Development Build) が必要です。Expo Goでは SDK 53以降Androidのプッシュ通知が動作しなくなったため、開発初期段階から開発ビルドを使用するのが推奨されます。
# EAS CLIのインストール
npm install -g eas-cli

# EASプロジェクトの初期化
eas init

# 開発ビルドの作成
eas build --profile development --platform all

# プレビュービルドの作成(内部テスト用)
eas build --profile preview --platform all
EAS Buildの無料プランでは、月あたりAndroid 15回・iOS 15回のビルドが可能です。Productionプラン(月額$199)では優先ビルドキューや追加ビルド枠が利用できます(出典: Expo Pricing)。
まとめ
React Nativeにおけるプッシュ通知の実装は、プロジェクトの技術スタックと運用体制に応じて最適なアプローチが異なります。
Expoプロジェクトでの開発なら expo-notifications が第一選択です。 セットアップが簡潔で、Expo Push Serviceによるサーバーサイドの実装負荷も低く抑えられます。SDK 54時点でConfig Plugin方式に移行し、カスタマイズ性も向上しています。
ネイティブコードを直接操作する必要がある場合は @react-native-firebase/messaging が適しています。 Firebase Analyticsとの連携やトピックベースの配信など、より高度な通知戦略を実現できます。FCM HTTP v1 APIへの移行は完了済みであることを確認してください。
通知の運用をマーケティングチームに委ねたい場合はOneSignalのようなサードパーティサービスが有効です。 ダッシュボードからのセグメント配信やA/Bテストにより、エンジニアの工数を抑えつつ通知施策を実行できます。
いずれの方法でも、iOS/Android両プラットフォームの権限設定・トークン管理・通知チャネル設定を正しく行うことが安定した通知配信の鍵となります。